
Introduction
Imagine you’re faced with different choices in your everyday life, and you need to make decisions based on specific conditions. Just like in real life, decision making plays a crucial role in Java programming too. It allows our programs to analyze situations and take different actions based on certain conditions. Decision-making statements in Java are mainly about selecting from the given possibilities. The better your choices, the better your decision-making. Similar situations arise in programming where we must make choices and then carry out the subsequent block of code in accordance with those choices. We have a variety of decision-making statements to address these instances, but before we do that, let’s first define a decision-making statement.
What Is Decision Making statement in Java?
Think of decision making statements as your program’s way of evaluating situations and making the best choice, just like you do when faced with different scenarios in real life. These statements help your program decide what actions to take based on certain conditions, allowing for dynamic and flexible program behavior.
Decision Making statements are essential for creating dynamic and flexible programs. They enable you to handle different scenarios, validate user input, and provide different Java outputs based on the conditions met. With decision making statements, you can create programs that behave differently under different circumstances, making them more versatile and capable of addressing various requirements. In Java programming, decision making statements play a crucial role in controlling the flow of your program. The primary Java decision-making constructs are the if-else, continue, break, and switch statements. During the course of the program’s execution, it determines the control flow.
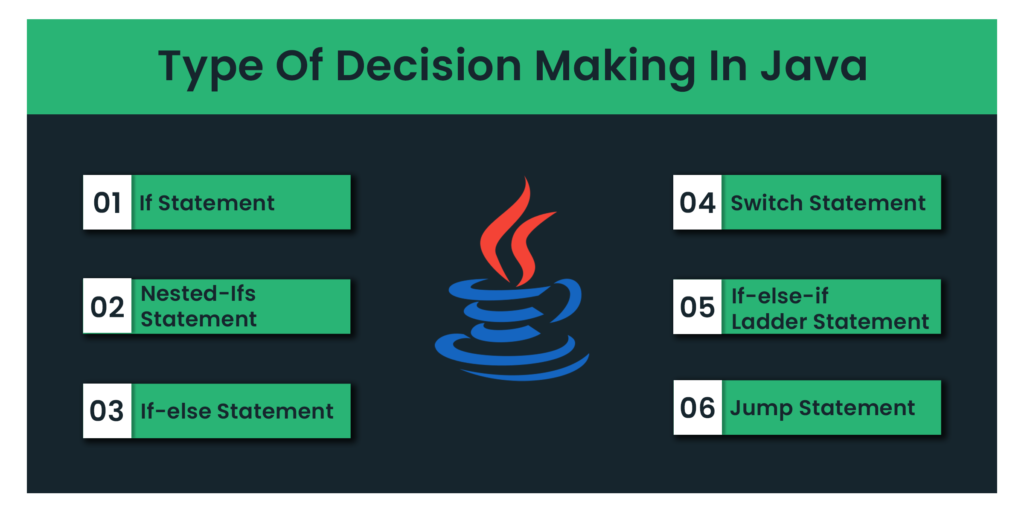
In Java, there are seven different ways to exercise decision-making:
- “if” Statement: This statement tests a condition and, if it is true, executes a block of code.
- “If-else” Statement: It inserts an additional block of code that will run in case the “if” statement’s condition is false.
- “If-else-if” According to which condition is true, different blocks of code are executed. It tests multiple conditions.
- Nested “if” Statement: By assessing many conditions within a condition, it allows for more complex decision-making.
- “Switch-case” According to the matched case, it evaluates an expression and runs a particular block of code. When a variable or expression has several alternative values, it is helpful.
- Nested “switch” Statement: It is a switch statement inside another switch statement, allowing for more intricate decision-making.
Java also has unique statements known as “jump statements” that let you control the execution of your code in loops or switch statements. These jump statements offer the following features:
- “break” Statement: The “break” statement enables you to immediately leave a loop or switch statement when it is present. By doing so, the current iteration can be stopped and the loop or switch block can be left behind.
- “continue” Statement: You can skip the remaining code in the current iteration of a loop and move on to the next iteration by using the “continue” statement. When you wish to skip some iterations based on a particular circumstance, it is helpful.
- “return” Statement: The “return” statement in Java methods is used to end the method and give a value back to the section of the code that called it. It enables you to finish the current method’s execution and return a result to the caller.
With these jump statements, loops, switches, and method executions can be handled with flexibility and control. You can modify your code’s behavior and improve its effectiveness and responsiveness to various scenarios by carefully using them.
Types Of Decision Making Statement In Java
If Statement in Java
The “if” statement in Java is like a traffic signal that helps your program make decisions. It allows you to run a specific piece of code only if a particular condition is met. It’s like saying, “If something is true, then do this!”
Syntax:
if(condition)
{
//code to be executed
}
Flow Diagram for `If` statement:
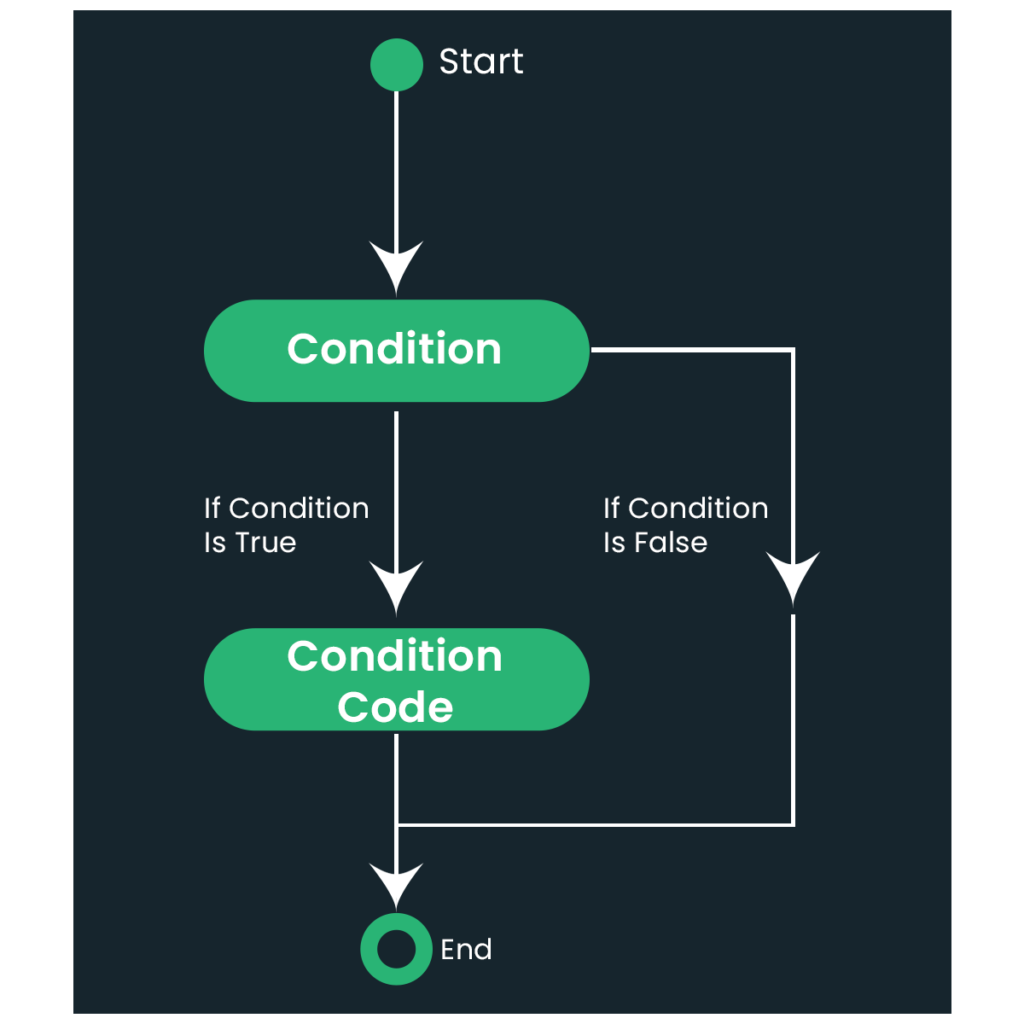
For example, imagine you have a cake, and you want to eat it only if it’s delicious. You can use the “if” statement in Java to check if the cake is indeed delicious before taking a bite. If the condition (the cake being delicious) is true, you can enjoy eating the cake. Otherwise, you might decide not to eat it.
In Java, you can write an “if” statement like this:
public class IfStatementExample {
    public static void main(String[] args) {

        int age = 18;

        if (age >= 18) {
            System.out.println("You are eligible to vote!");
        }
    }
}
Output:
You are eligible to vote!In this instance, the age variable has been given the value of 18. The “if” statement determines whether the age value is higher than or equal to 18. The code inside the curly braces will be performed if the condition is met, printing “You are eligible to vote!”
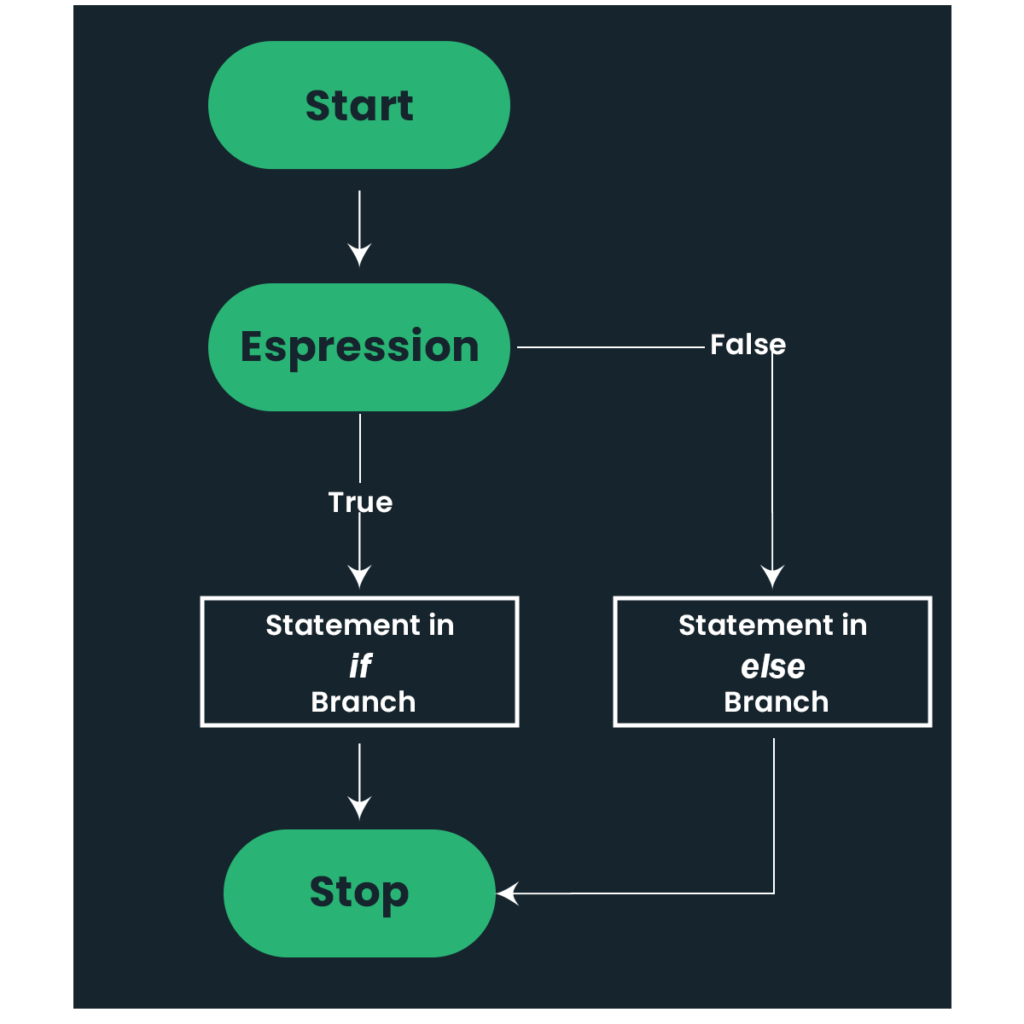
If-Else Statement in Java
Now you may be wondering what if the condition is not true and you want to execute some another block of code. The “if-else” statement in Java is another decision-making statement that allows you to execute different blocks of code based on the condition’s result. It provides an alternative path to take when the condition is not true.
Syntax:
if(condition)
{
//code to be executed if the condition is true
}
else
{
//code to be executed if the condition is false
}
Flow Diagram for If-else Statement:
Here’s a simple example to illustrate the usage of the “if-else” statement:
public class IfElseStatementExample {
    public static void main(String[] args) {
        int age = 16;

        if (age >= 18) {
            System.out.println("You are eligible to vote!");
        } else {
            System.out.println("You are not eligible to vote yet.");
        }
    }
}
Output:
You are not eligible to vote yet.In this instance, the age variable has been given the value of 16. The “if” statement checks whether the age value is higher than or equal to 18. If the condition is met, the first block’s code—which prints “You are eligible to vote!”—is run. The code inside the “else” block (which prints “You are not eligible to vote yet.”) is instead run if the condition is false, skipping the first block altogether.
The “if-else” statement acts as a fork in the road, allowing the program to take different paths based on the condition. If the condition is true, one set of instructions is executed; otherwise, another set of instructions is executed.
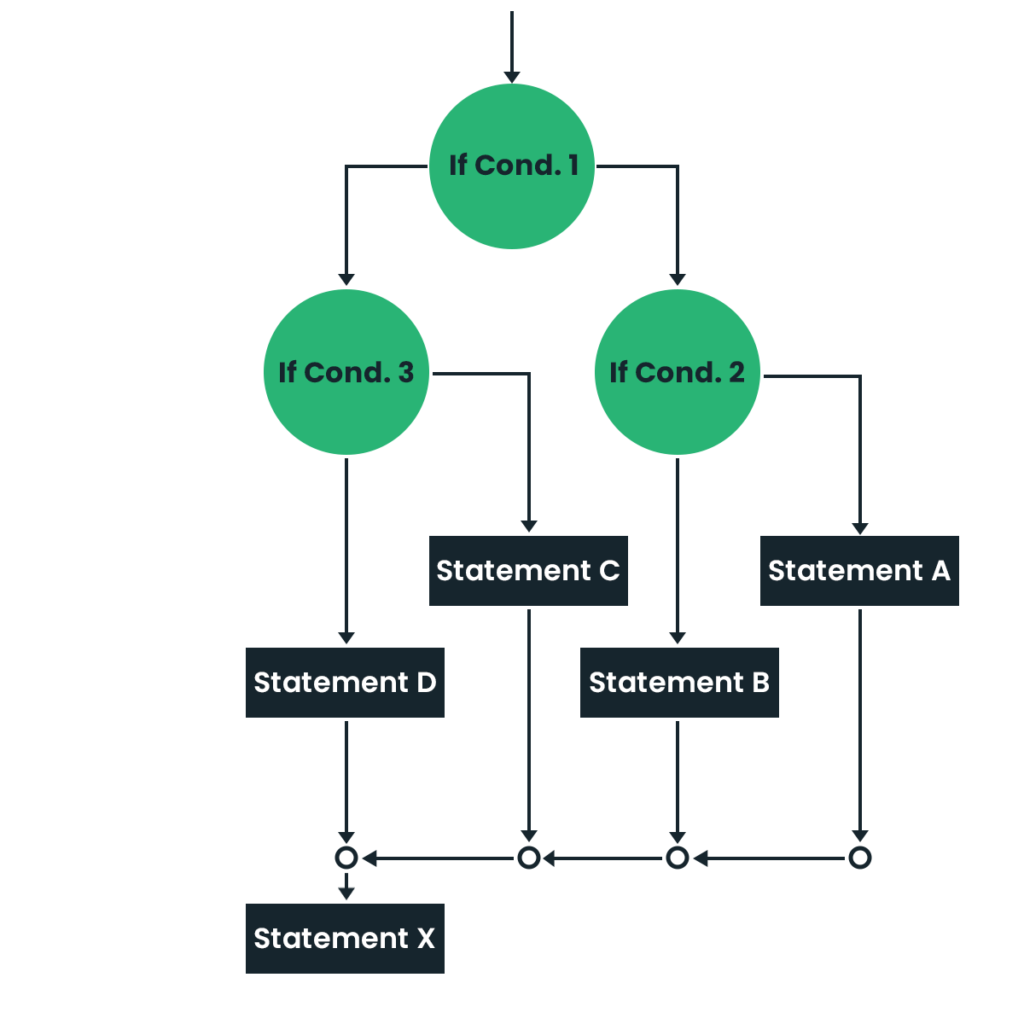
Nested If Statements in Java
Imagine you are a student and you want to buy a ticket for a concert. The ticket prices depend on two factors: your age and whether you are a student or not. So now, firstly there is a condition of your age, and after that, there is also one condition so this is the case of condition inside the condition. Java’s “nested if” statement allows you to nest one “if” statement inside another. By including more conditions inside of existing conditions, it aids in the resolution of more complex decision-making scenarios.
Syntax:
if(condition)
{
//code to be executed
if(condition)
{
//code to be executed
}
}
Flow Diagram of a Nested If Statement
Consider yourself a student who enjoys watching films. You must meet certain requirements in order to watch films:
public class TicketSystem {
    public static void main(String[] args) {
        int age = 20;
        boolean isStudent = false;

        if (age >= 18) {
            System.out.println("You are eligible to watch movies.");

            if (isStudent) {
                System.out.println("As a student, you get a discounted ticket.");
            } else {
                System.out.println("You need to purchase a regular ticket.");
            }
        } else {
            System.out.println("Sorry, you are not eligible to watch movies.");
        }
    }
}
Output:
You need to purchase a regular ticket.In this example, we have a ticket system where the eligibility to watch movies is determined based on age. If the person’s age is 18 or above, they are eligible. However, there is an additional condition to check if the person is a student or not.
The nested if statement comes into play when the person is eligible to watch movies. It further checks if the person is a student or not. If they are a student, a message about a discounted ticket is displayed. Otherwise, a message about purchasing a regular ticket is displayed.
If-else-If Statements in Java
The “if-else-if” statement in Java is a decision-making construct that allows you to evaluate multiple conditions in a sequential manner. It’s like making a series of choices based on different possibilities in real-life situations.
Syntax:
if
{
//code to be executed
}
else if(condition)
{
//code to be executed
}
else if(condition)
{
//code to be executed
}
else
{
//code to be executed
}
Flow Diagram of If-else-If statement:
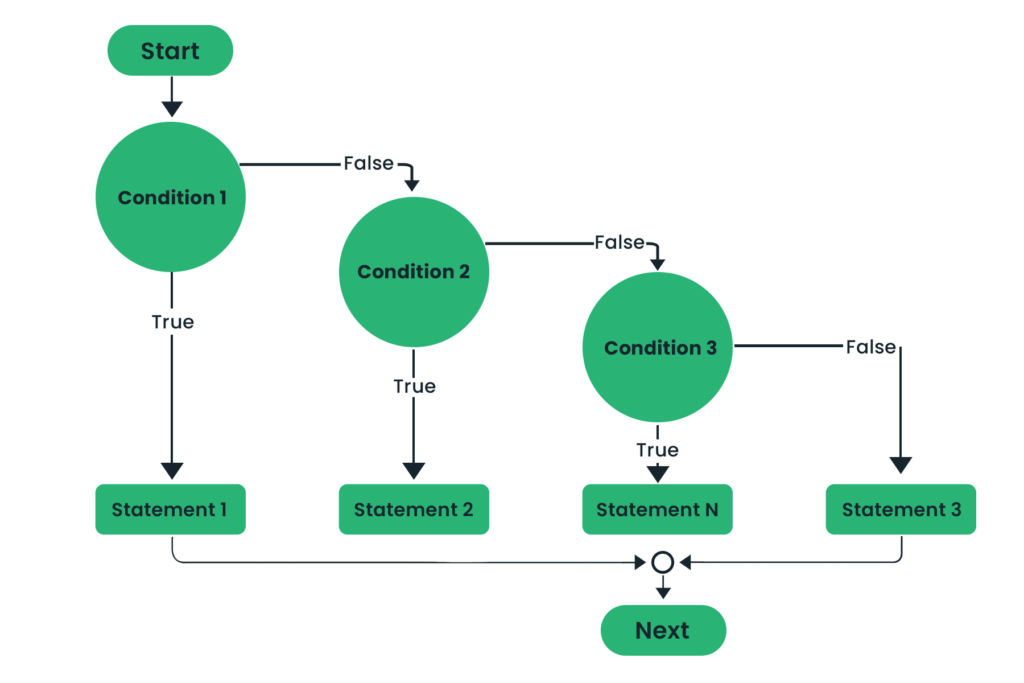
Suppose you need to travel somewhere, and you have different options for transportation, such as walking, cycling, taking a bus, or driving a car. The decision on which mode of transportation to choose depends on the distance you need to travel.
Using the “if-else-if” statement, you can make a decision based on the distance as follows:
public class TransportationExample {
    public static void main(String[] args) {
        int distance = 10; // Distance in kilometers

        if (distance < 1) {
            System.out.println("You can walk to your destination.");
        } else if (distance < 5) {
            System.out.println("Cycling would be a good option for you.");
        } else if (distance < 10) {
            System.out.println("Taking a bus is a convenient choice.");
        } else {
            System.out.println("It would be best to drive a car.");
        }
    }
}
Output:
It would be best to drive a car.In this example, the program evaluates the value of the distance variable and determines the appropriate mode of transportation. Here’s how it works:
If the distance is less than 1 kilometer, the program suggests walking as the suitable mode of transportation.
If the distance is between 1 and 4 kilometers, the program recommends cycling.
If the distance is between 5 and 9 kilometers, the program suggests taking a bus.
If the distance is 10 kilometers or more, the program advises driving a car.
By using the “if-else-if” statement, you can make informed decisions based on different conditions. It allows you to handle various scenarios and choose the appropriate course of action based on the specific situation at hand.
Switch Statements in Java
Java’s “switch” statement is a decision-making statement that lets you choose which of numerous code blocks to run depending on the value of a certain variable. It offers a practical method for handling various alternatives or scenarios in your code.
Syntax:
switch(expression)
{
case <value1>:
//code to be executed
break;
case <value2>:
//code to be executed
break;
default:
//code to be defaultly executed
}
Imagine you are in a coffee shop and want to order a beverage. You approach the counter, and the barista asks for your order. Instead of using a series of “if” statements to check each possible option, the barista uses a switch statement.
The barista takes your order and checks the value you provide. Based on that value, they can quickly determine which beverage you want and prepare it accordingly. Each possible value represents a different option, such as “coffee,” “tea,” “cappuccino,” or “latte.” The barista can efficiently handle all these options using a switch statement.
Here’s a simple example code that demonstrates the use of the switch statement:
public class BeverageExample {
    public static void main(String[] args) {
        String beverage = "cappuccino";
        switch (beverage) {
            case "coffee":
                System.out.println("Enjoy your hot coffee!");
                break;
            case "tea":
                System.out.println("Savor the flavor of your tea!");
                break;
            case "cappuccino":
                System.out.println("Indulge in the creamy cappuccino!");
                break;
            default:
                System.out.println("Sorry, we don't have that beverage.");
        }
    }
}
Output:
Indulge in the creamy cappuccino!In this example, the variable beverage holds the value “cappuccino.” The switch statement evaluates the value and matches it with the corresponding case. As a result, it prints the message “Indulge in the creamy cappuccino!” to indicate your selected beverage.
Here’s how the switch system works:
- You provide an expression that will be evaluated. This expression should result in a value that can be compared to the cases (options) within the switch statement.
- The switch statement then checks the value of the expression against each case (option) specified within the switch.
- If the value of the expression matches a case, the corresponding block of code associated with that case is executed. This is called “falling through” the switch statement.
- If the value of the expression does not match any of the cases, the code block associated with the default case is executed. The default case acts as a catch-all option when none of the other cases match.
- When a case is matched and its associated code block is run, the control “breaks” out of the switch statement and continues with the code after the switch statement. If there is no break statement after a case, the execution will “fall through” to the next case, executing the code blocks of following cases as well.
The default case is optional. It is executed when none of the other cases match the value of the expression. Including a default case allows you to handle unexpected or invalid input gracefully.
Flow Diagram of Switch Statement:
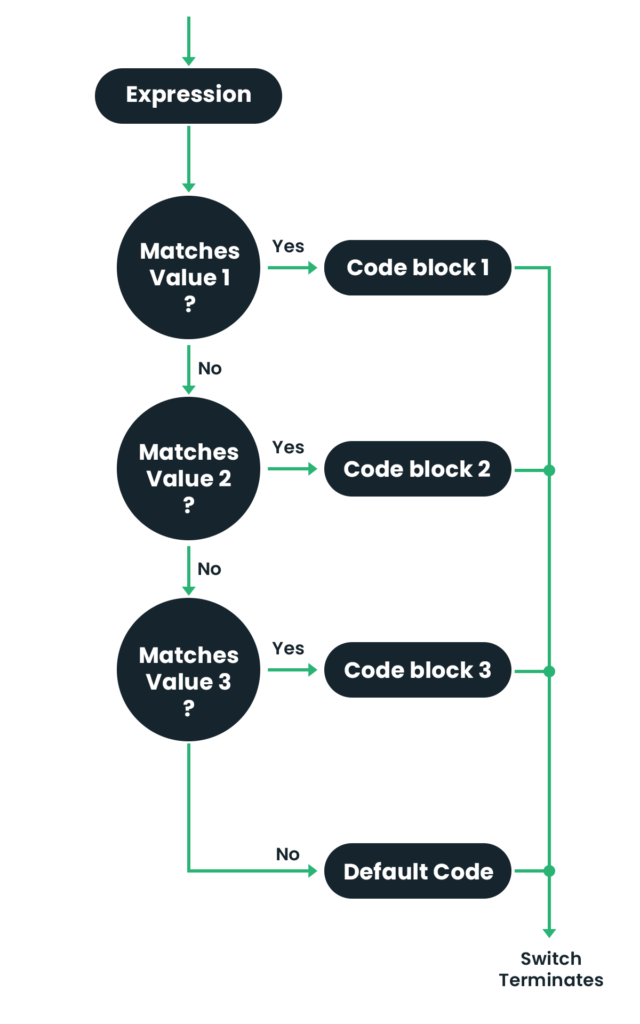
In simpler terms, the switch statement is like a menu where you have multiple options, and based on the value of the expression, you choose the appropriate option and perform the associated action.
Imagine you are developing a simple calculator program that performs basic arithmetic operations based on user input. The user enters two numbers and selects the operation they want to perform (addition, subtraction, multiplication, or division).
Using if-else statements, the code for this calculator program would look like this:
if (operation.equals("add")) {
    result = number1 + number2;
} else if (operation.equals("subtract")) {
    result = number1 - number2;
} else if (operation.equals("multiply")) {
    result = number1 * number2;
} else if (operation.equals("divide")) {
    result = number1 / number2;
} else {
    System.out.println("Invalid operation!");
}
While this approach works, it becomes repetitive and less efficient as the number of operations increases. The switch statement offers a more concise and structured alternative.
Using the switch statement, we can rewrite the calculator program like this:
switch (operation) {
    case "add":
        result = number1 + number2;
        break;
    case "subtract":
        result = number1 - number2;
        break;
    case "multiply":
        result = number1 * number2;
        break;
    case "divide":
        result = number1 / number2;
        break;
    default:
        System.out.println("Invalid operation!");
}
Here, the switch statement evaluates the value of operation and matches it with the corresponding case. The code execution jumps to the matching case and performs the desired arithmetic operation.
By using the switch statement, we can handle different operations in a more concise and organized manner. It eliminates the need for multiple if-else statements and provides a cleaner code structure.
Nested Switch statement in Java
In Java, a nested switch statement is when you have a switch statement inside another switch statement. It allows you to make more specific decisions based on multiple conditions.
Syntax:
switch(expression)
{
case <value1>:
//Nested Switch
switch(num)
{
case <num1>:
//code to be executed
break;
case <num2>:
//code to be executed
break;
default:
//code to be defaultly executed
}
break;
case <value2>:
//code to be executed
Break;
case <value3>:
//code to be executed
Break;
default:
//code to be defaultly executed
}
Flow Diagram of Nested Switch Statement:

Let’s consider a scenario where you are developing a food ordering system for a restaurant. The system needs to handle the selection of food type and size. Here’s how nested switch statements can help:
The outer switch statement handles the selection of the food type, such as pizza, burger, or sushi. Each food type corresponds to a specific set of choices for the food size. Inside each case of the outer switch statement, there is another switch statement that handles the selection of the food size. For example:
Outer Switch Statement (Food Type):
Case 1: Pizza
Inner Switch Statement (Pizza Size):
Case 1: Regular
Case 2: Large
Case 3: Extra Large
Case 2: Burger
Inner Switch Statement (Burger Size):
Case 1: Single Patty
Case 2: Double Patty
Case 3: Triple Patty
Case 3: Sushi
Inner Switch Statement (Sushi Size):
Case 1: Small Roll
Case 2: Medium Roll
Case 3: Large Roll
By using nested switch statements, you can handle different combinations of food type and size selections. For example, if the user selects pizza (outer switch case 1) and then chooses a regular size (inner switch case 1), you can display a message like “You have ordered a regular-sized pizza.”
This nested structure allows you to handle the specific choices for each food type in an organized manner. You can easily extend this example by adding more food types and their corresponding sizes
Jump Statement
Jump statements in Java provide a way to modify the normal flow of control within loops or switch statements. They allow you to jump to a specific point in your code, skip iterations of a loop, or exit a loop or method altogether.
Imagine you’re playing a game where you need to collect items in different levels. Here’s how jump statements can be explained:
- Break Statement: It’s like finding an exit door in the game that allows you to leave the current level or loop. Once you reach the exit door (encounter the break statement), you stop executing the remaining code inside the loop or switch statement and move on to the next part of the game.
- Continue Statement: It’s like a shortcut that lets you skip certain parts of the game level or iterations of a loop. For example, if you encounter a challenging obstacle or puzzle, you can use the continue statement to skip that particular section and proceed to the next part of the game or the next iteration of the loop.
- Return Statement: It’s similar to finishing the game or completing a specific task within the game. When you encounter the return statement, you exit the current method and return to the calling code. It’s like successfully completing a level and returning to the main game menu.
By understanding and using jump statements effectively, you can have more control over the flow of your program, handle different scenarios, and make your code more efficient.
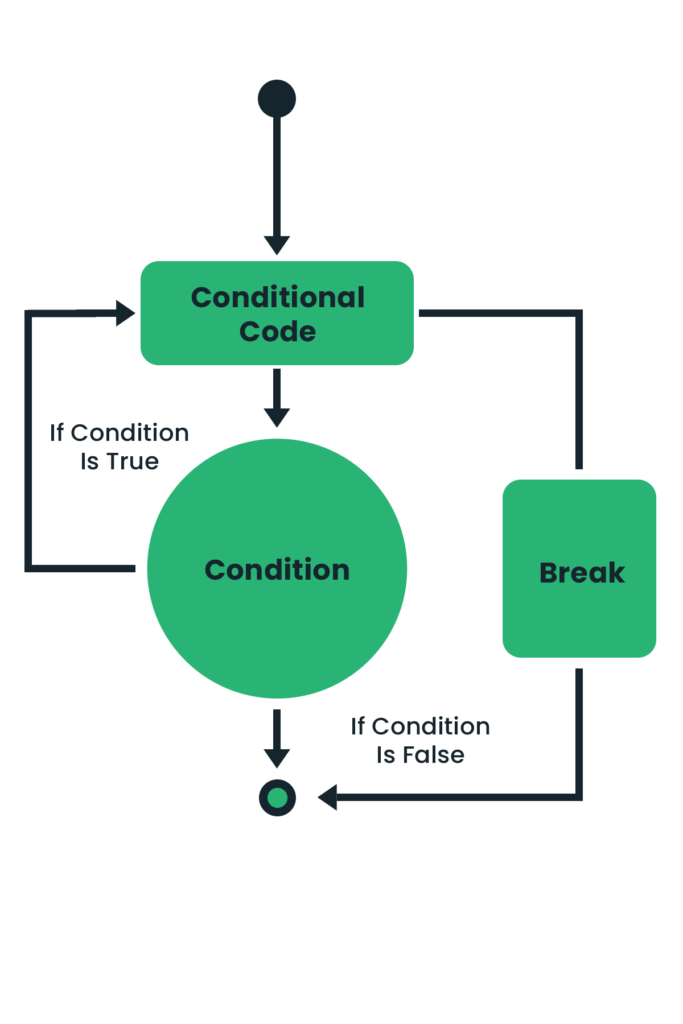
Break Statement
The “break” statement in Java is a jump statement that allows you to exit a loop or switch statement prematurely. It provides a way to break out of the current code block and continue execution outside of it.
Consider you have a series of exams to complete, and each exam has a certain time limit. You start taking the exams one by one, but you want to stop once you’ve reached the maximum time you can spend. In this scenario, the “break” statement can be compared to an emergency button that allows you to stop taking the exams when you’ve reached the maximum time limit. As soon as you encounter the “break” statement, it breaks out of the current exam (loop) and moves on to the next part of the day, such as relaxing or studying for the next day’s exams.
FlowChart of Break Statement:
Here’s a simple example of using the break statement in a switch case:
public class BreakExample {
    public static void main(String[] args) {
        int choice = 2;

        switch (choice) {
            case 1:
                System.out.println("You selected option 1.");
                break;
            case 2:
                System.out.println("You selected option 2.");
                break;
            case 3:
                System.out.println("You selected option 3.");
                break;
            default:
                System.out.println("Invalid choice.");
                break;
        }

        System.out.println("End of program.");
    }
}
Output:
You selected option 2.In this example, we have a variable choice that represents the user’s selection. We use a switch statement to check the value of choice and execute different code blocks based on the selected option.
If the value of choice is 1, it prints “You selected option 1.” If the value is 2, it prints “You selected option 2.” If the value is 3, it prints “You selected option 3.” If none of these cases match, the default case is executed, which prints “Invalid choice.” After executing the corresponding case, the break statement is used to exit the switch statement and continue with the rest of the program. It prevents the execution from falling through to the next case.
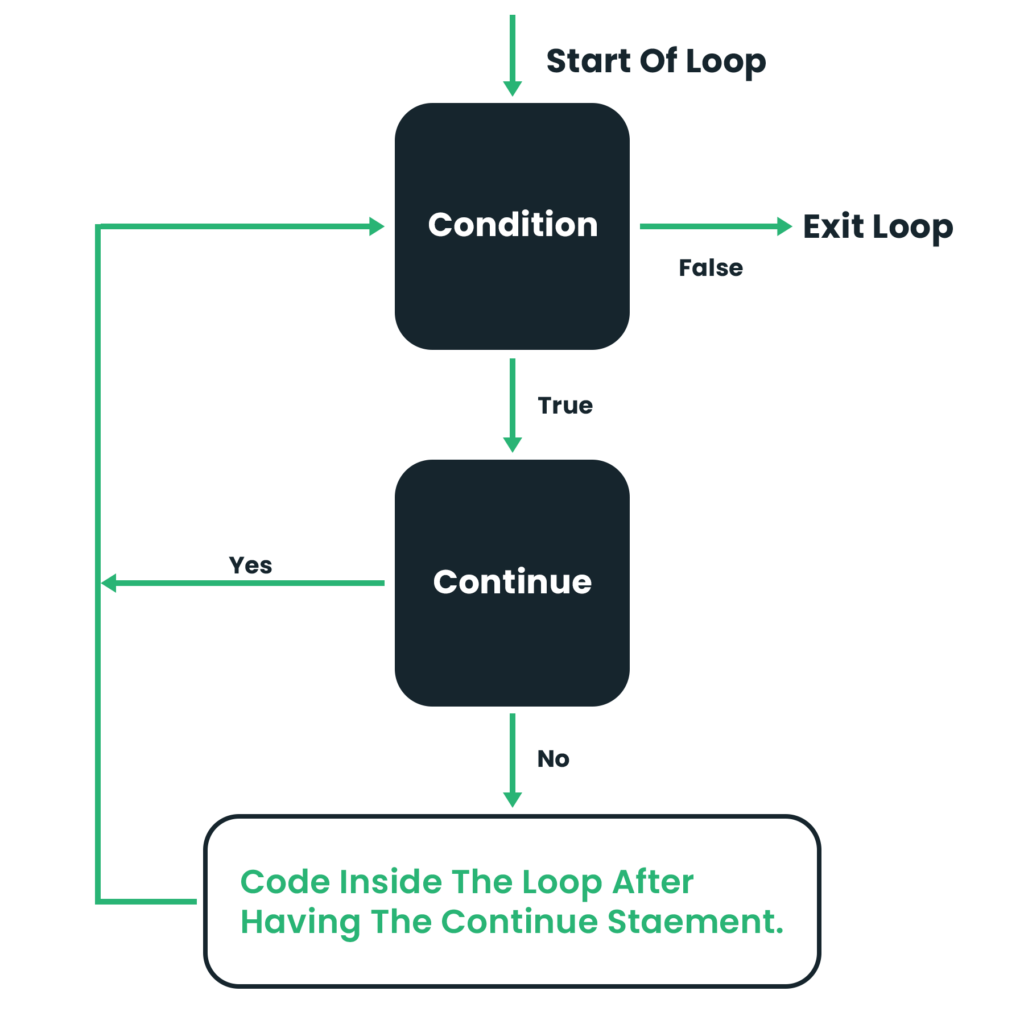
Continue Statement
In Java, the continue statement is used to skip the remaining code in a loop (will study later in the next blog) iteration and go to the next iteration. It allows you to bypass specific parts of the loop’s code block based on a condition.
Imagine you’re preparing for multiple subjects, and you have a study routine for each subject. Each routine consists of several topics that you need to cover. While studying a particular subject, you come across a challenging topic that you find difficult to understand. Instead of getting stuck and wasting time, you decide to use the continue statement. It’s like flipping to the next page in your study material, skipping the current topic temporarily, and moving on to the next topic. You know that you’ll come back to the skipped topic later, but for now, you want to make progress by focusing on the other topics that you find easier.
When a given condition is met, the continue statement in Java programming allows you to skip the remaining code within a loop’s iteration. It allows you to manage scenarios when you want to bypass specific iterations and continue with the next iteration of the loop more efficiently. You can regulate the flow of execution and optimize your code based on certain conditions or requirements in this manner.
By using the continue statement, you can save time, improve efficiency, and make your code more organized by selectively skipping certain parts of the loop’s code block when necessary.
Flowchart of the Continue Statement:
Here’s a simplified example that uses a loop to demonstrate the continue statement:
public class ContinueExample {
    public static void main(String[] args) {
        // Imagine you are counting from 1 to 10
        for (int i = 1; i <= 10; i++) {
            // Check if the current number is divisible by 2
            if (i % 2 == 0) {
                // Skip the iteration if the number is divisible by 2
                continue;
            }

            // Print the current number
            System.out.println(i);
        }
    }
}
Output:
1
3
5
7
9
In this example, we have a for loop that counts from 1 to 10. Inside the loop, we use the continue statement to skip the iteration if the current number is divisible by 2.
When the loop encounters a number that is divisible by 2, such as 2, 4, 6, 8, and 10, it executes the continue statement. This causes the loop to skip the remaining code within the loop body and move on to the next iteration.
As a result, only the odd numbers (1, 3, 5, 7, and 9) are printed on the console. The continue statement allows us to control the flow of the loop and selectively skip certain iterations based on a condition.
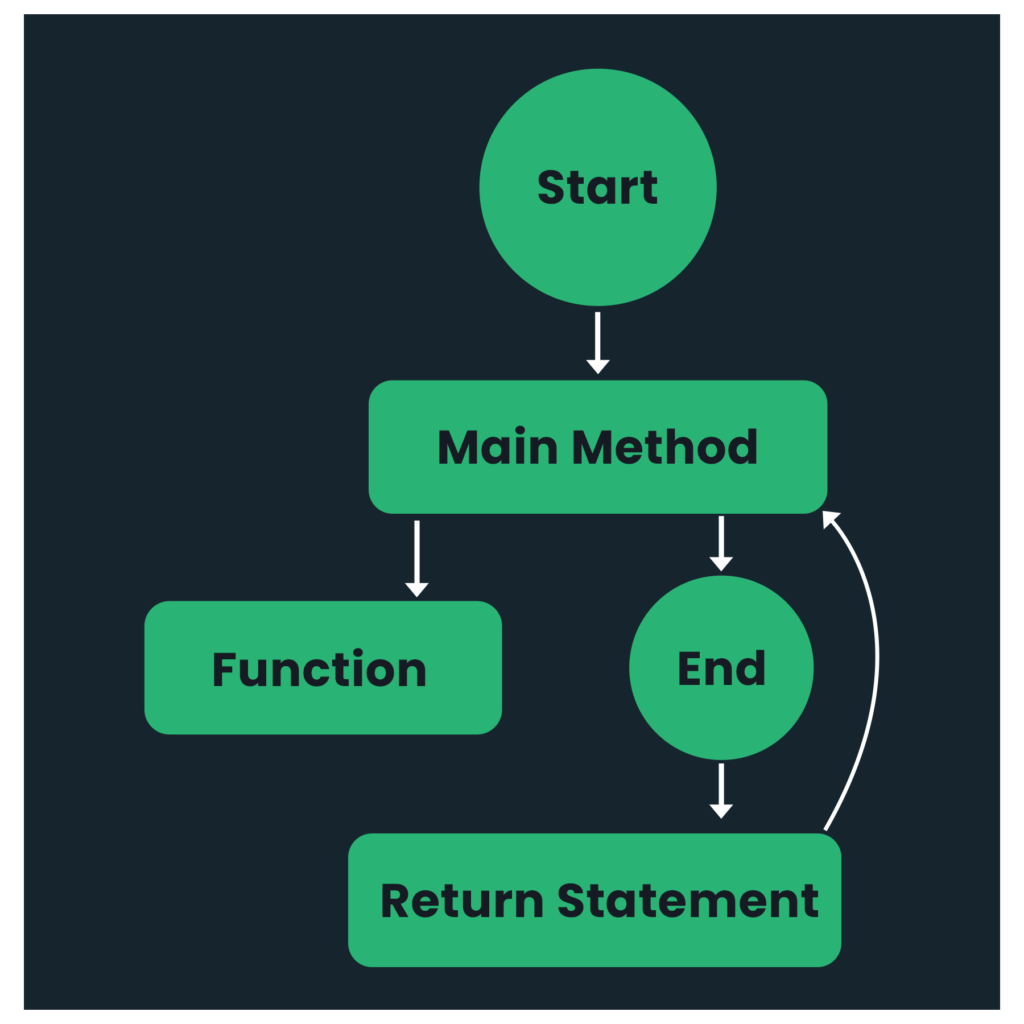
Return Statement
In Java, the return statement is used to exit a method and provide a result or value back to the caller. It’s like completing a task and giving something in return.
For example, let’s say you have a method called calculateTotalPrice that calculates the total price of a pizza order. After performing the necessary calculations, you use the return statement to send the final price back to the code that called the method. This way, the calling code can use the returned value for further processing or display.
Here’s a simple Java code snippet to illustrate this:
public class PizzaDelivery {

    public static double calculateTotalPrice(int pizzaCount) {
        double pricePerPizza = 12.99;
        double totalPrice = pizzaCount * pricePerPizza;

        // Return the calculated total price
        return totalPrice;
    }

    public static void main(String[] args) {
        int numberOfPizzas = 3;
        double total = calculateTotalPrice(numberOfPizzas);

        System.out.println("Total price: $" + total);
    }
}
Output:
Total price: 38.97In this example, the calculateTotalPrice method takes the number of pizzas as an argument and calculates the total price based on a fixed price per pizza. The calculated total price is then returned using the return statement. In the main method, we call the calculateTotalPrice method with the number of pizzas and store the returned value in the total variable. We can then use the total variable to display the total price of the pizza order.
Flowchart of the Return statement:
Special Way Of Writing If-else Statement
The ternary operator in Java is a concise way of writing an if-else condition. It allows you to make a decision between two values based on a condition, similar to an if-else statement.
Syntax:
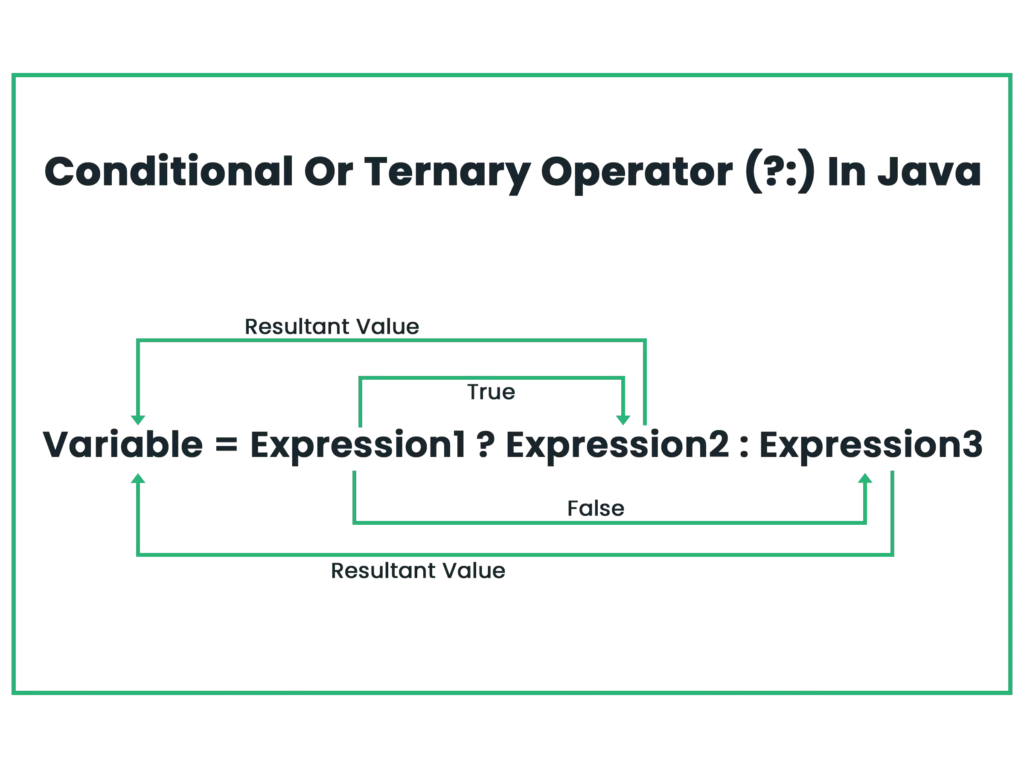
Here’s the example code using both the if-else condition and the ternary operator:
Using if-else condition:
public class Main {
    public static void main(String[] args) {
        int age = 20;
        String message;

        if (age >= 18) {
            message = "You are an adult";
        } else {
            message = "You are not an adult";
        }

        System.out.println(message);
    }
}
Using the ternary operator:
public class Main {
    public static void main(String[] args) {
        int age = 20;
        String message;

        message = (age >= 18) ? "You are an adult" : "You are not an adult";

        System.out.println(message);
    }
}
In both cases, we have an int variable age initialized with a value of 20 and a String variable message to store the result.
Both versions of the code will produce the same output:
You are an adultThe if statement is used to decide whether the age is greater than or equal to 18 in the if-else condition code. The code inside the if block runs and the message “You are an adult” is given to the message variable if the condition is true. The code in the else block runs and the message “You are not an adult” is given to the message variable if the condition is false.
In the ternary operator code, we use the ternary operator (age >= 18) ? “You are an adult” : “You are not an adult” to achieve the same result. If the condition (age >= 18) is true, the value “You are an adult” is assigned to the message variable. If the condition is false, the value “You are not an adult” is assigned.
The ternary operator provides a more concise way to write simple if-else conditions, making the code more compact and easier to read.
Conclusion
Decision-making in Java is an essential aspect of programming that allows the program to make choices based on certain conditions.
- The if-else statement is used to execute a block of code if a condition is true and an alternative block if the condition is false.
- Nested if statements allow for more complex decision-making by incorporating multiple conditions within one another.
- The if-else-if statement provides a way to evaluate multiple conditions in a sequential manner and execute the corresponding block of code based on the first true condition.
- The switch statement is useful when there are multiple possible values for a variable and different actions need to be taken based on each value.
- Jump statements that alter the typical control flow within loops or switch statements include break, continue, and return. The continue statement skips the current iteration of a loop and advances to the next iteration, the break statement is used to end a loop or switch statement. The return statement gives the caller a value and ends the method.
Understanding and effectively using decision-making constructs in Java can greatly enhance the flexibility and functionality of your programs.
It is important to carefully design and structure your decision-making code to ensure readability and maintainability.
Read Some Latest Blogs
- Data Science vs Data Analytics: Top Key Differences for Success

- How To Become A Data Scientist In India?: Achieve Your Data Scientist Dreams

- What are Callback Function in JavaScript?: A Guide to Effective Implementation

- Top 9 Interview Questions and Answers for Freshers Success

- What Is Python and Its Dynamic Uses?
