
Introduction
Java, a widely used programming language known for its versatility and reliability, owes much of its power to the Java Virtual Machine (JVM) Architecture. Let’s examine the JVM’s function in executing Java programs and how it enables the concept of “Write Once, Run Anywhere” (WORA).
Definition Of JVM
The Java Virtual Machine, commonly referred to as JVM, is a virtual computer that runs Java code. It acts as a translator between the computer’s native language and your Java code. Consider it as a skilled interpreter who can translate your words so that speakers of many languages understand you.
Importance Of JVM In Running Java Applications
The JVM Architecture
plays a vital role in running Java applications, offering benefits that make Java widely applicable. Its benefits include:
1. Portability
JVM’s magic lies in its ability to make Java code portable across different systems. It’s like a universal charger that allows you to plug in your electronic devices, such as smartphones, tablets, or laptops, regardless of the manufacturer. The charger handles the voltage and power requirements, making it possible to use your devices worldwide without needing different chargers for each country.
2. Memory Management in JVM Architecture
JVM takes care of memory management, ensuring your Java application runs smoothly. Consider a closet organizer that optimizes space utilization by intelligently arranging clothes, shoes, and accessories. Similarly, the JVM efficiently allocates and releases memory for objects, keeping your program’s memory usage in check and preventing memory-related issues.
3. Exception Handling in JVM Architecture
JVM acts as a problem solver, dealing with errors that occur during program execution. Think of it as a safety net during a trapeze performance. If a trapeze artist loses grip and falls, the net catches them, preventing a disastrous outcome. Similarly, JVM detects errors or exceptions in your code and gracefully handles them, preventing your program from crashing and helping you identify and resolve issues.
WORA And Its Relation To JVM Architecture
WORA, or “Write Once, Run Anywhere,” is a key advantage of Java, made possible by the JVM Architecture. Imagine writing a letter in your native language and being able to share it with people around the world who speak different languages. The recipients use their respective translators to understand your message. Similarly, the JVM serves as a translator, enabling Java code to be written once and run on any system with a compatible JVM.
The JVM simplifies running Java programs on different systems. It’s like a universal remote that works with any TV, saving you from having multiple remotes for different TVs.
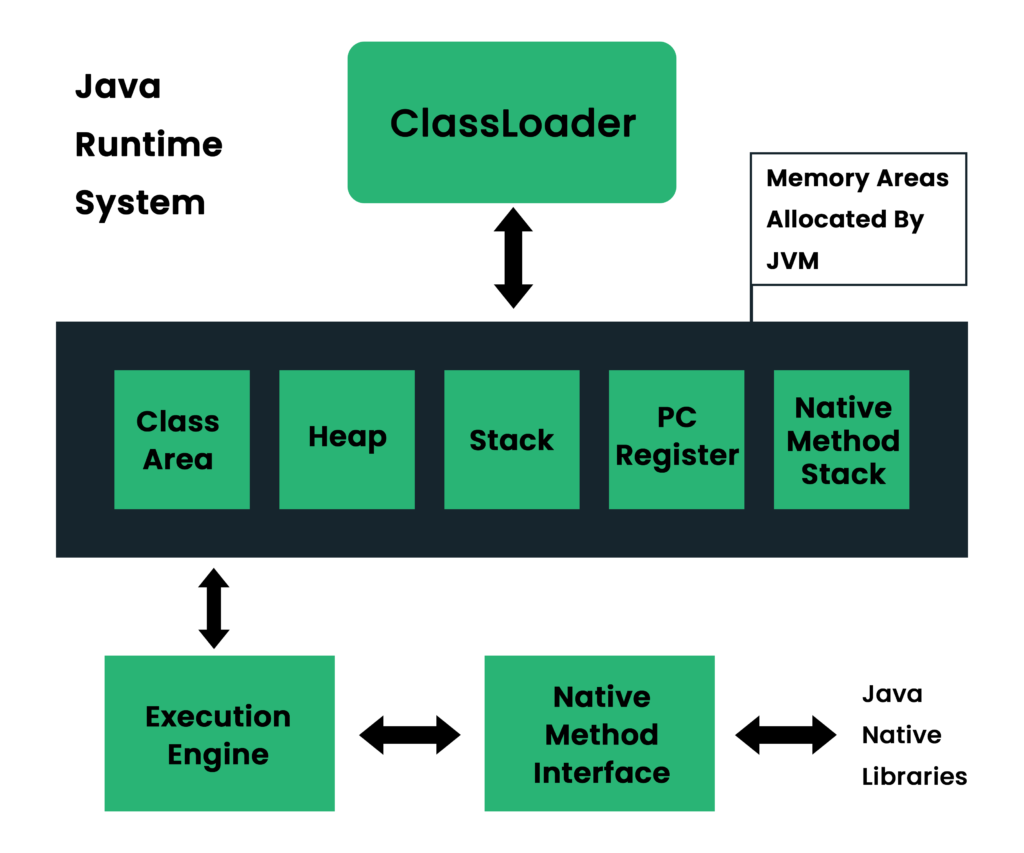
JVM Architecture
The JVM Architecture is like a smart assistant that helps your computer understand and execute Java programs. Let’s explore its architecture, which consists of three key parts:
1. Class Loader
The class loader is like a librarian that finds and organizes the Java classes your program needs, making sure everything is ready to go.
2. Runtime Data Area
The runtime data area serves as memory storage for different program execution components, similar to a workspace that has multiple divisions.
- Method Area
- Heap Area
- Stack Area
- PC Register
- Native Method Stack Area
3. Execution Engine
The execution engine acts as a skilled translator, converting your Java code into a language that your computer can understand and execute. It does this through two methods:
- Interpreter
- JIT Compiler
Compilation Of .java Files And Creation Of .class files
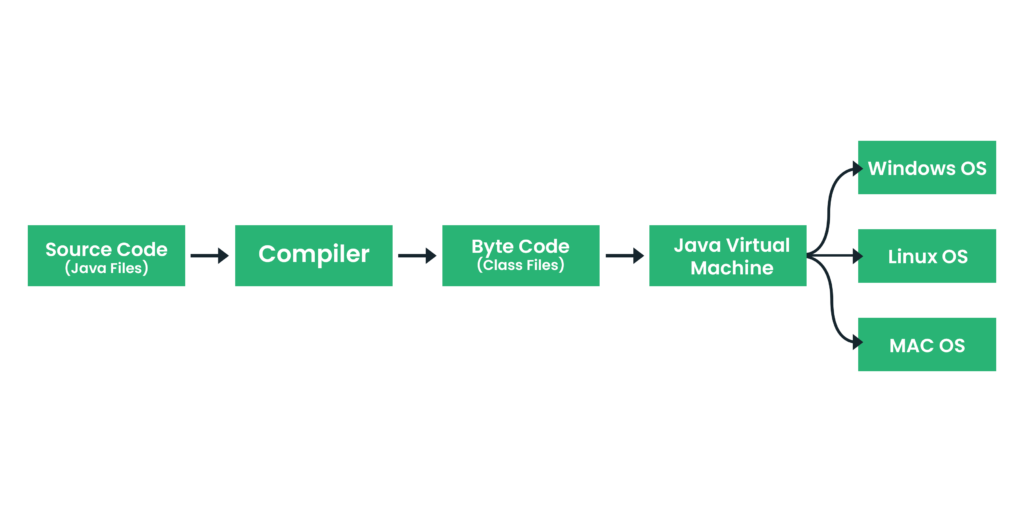
When you write Java code in a .java file, it’s in a human-readable form. The process of transforming this code into bytecode is similar to compiling a document into a PDF format. The Java compiler (javac) compiles the .java file and generates bytecode instructions that can be understood by the JVM. These bytecode instructions are stored in .class files, which contain the binary representation of your code.
Steps Involved In running .class files:
When you run a Java program, the JVM takes over the execution process. Here are the steps involved:
- Class Loading: The JVM’s class loader locates and loads the required .class files into memory.
- Bytecode Verification: The bytecode verifier ensures that the bytecode is valid and doesn’t violate any security rules. It’s like a security checkpoint👮💼 that scans your luggage at the airport to ensure there are no prohibited items.
- Execution: The JVM’s execution engine interprets the bytecode instructions or dynamically compiles them into machine code using the JIT compiler. The bytecode instructions are executed, and the program’s logic is carried out.
- Memory Management: The JVM manages memory allocation and deallocation. It automatically handles memory usage, freeing up memory occupied by objects that are no longer needed.
- Exception Handling: The JVM detects and handles exceptions that occur during program execution. It ensures that your program doesn’t crash when unexpected situations arise, just like a safety net that catches you when you stumble.
Now let’s deep dive into the working and functioning of JVM i.e. JVM Architecture.
ClassLoader Subsystem In JVM Architecture
1. Introduction:
Have you ever wondered how Java programs easily load and run many classes? The Class Loader Subsystem, an important component of the Java Virtual Machine (JVM), holds the key to the answer. Let’s explore the Class Loader Subsystem’s operations, understand its function in loading classes, and inspect its key components.
2. Understanding the ClassLoader Subsystem:
Consider the Class Loader Subsystem as your trusted friend who helps in finding and loading the classes your Java program requires. Similar to a diligent librarian, it finds the necessary class files and brings them into memory so they are available for use. When your program needs the right classes, the Class Loader Subsystem ensures that they are easily available.
3. Components of the ClassLoader Subsystem:
The Class Loader Subsystem consists of different components, each playing a crucial role in the class loading process. Let’s explore them one by one:
- Bootstrap Class Loader:
This is like the superhero of class loaders, responsible for loading the core Java classes that are part of the Java Development Kit (JDK). It’s the first class loader that comes into action when the JVM starts up. Just as a superhero lays the foundation for a story, the Bootstrap Class Loader provides the essential building blocks for your Java programs.
- Extension Class Loader:
Imagine you have some additional modules or libraries that enhance the functionality of your Java program. The Extension Class Loader helps in loading these extra modules, extending the capabilities of the core Java classes. It’s like a friendly assistant who fetches the special tools you need to enhance your work.
- System/Application Class Loader:
Now, think of the System/Application Class Loader as your personal courier service. It delivers the classes specific to your application, including the ones you’ve created, to the JVM. This class loader looks into the classpath of your application and ensures that all your custom classes are loaded correctly.

How Does the ClassLoader Subsystem Work?
When your Java program runs, the Class Loader Subsystem follows a specific sequence of steps to load and prepare the classes:
- Loading: The Class Loader Subsystem searches for the required class files based on their names. It looks in various locations, such as directories or JAR files, to find these files. It’s like a detective on a mission, tracking down the right suspects to solve the case.
- Linking (Verification, Preparation, and Resolution):
The Class Loader Subsystem performs three essential functions in the linking process: verification, preparation, and resolution.
- Verification: This step validates the reliability and accuracy of the class files. It looks for any possible coding faults or security issues. It’s similar to conducting a background check on people before trusting them with important duties.
- Preparation: The Class Loader Subsystem sets up the class by allocating memory for its variables and functions. It provides the necessary data structures for the class to be successfully executed. It resembles setting up a workspace with all the equipment and supplies required to finish a task.
- Resolution: Resolution involves resolving any dependencies the class may have on other classes or libraries. It ensures that all required classes are available and linked correctly. It’s like connecting the dots and ensuring that all the pieces fit together seamlessly.
- Initialization: After linking, the Class Loader Subsystem initializes the class by executing the static blocks of code and assigning initial values to static Java variables. It’s like setting up the stage before a play begins, ensuring everything is ready for a seamless performance.

Runtime Method Areas In JVM Architecture
Let’s dive into something called Java Memory Areas. These areas are like special sections where your program’s data and instructions are stored. Understanding them is important for becoming a skilled Java programmer. So, let’s jump in and unravel the secrets of Java Memory Areas!
1. Heap Area
Imagine the Heap as a busy marketplace. This is where your program creates and manages objects. Just like shoppers in a marketplace, your program interacts with objects in the Heap. It’s a flexible space that expands and shrinks as needed, making sure everything runs smoothly.
2. Stack Area
Now, think of the Stack as a stack of index cards🃏♠️. Each card represents a method in your program. When a method is called, a new card is added to the stack, keeping track of what’s happening. This helps your program remember which methods to execute in the right order.
3. PC Register
The PC Register is like a helpful guide. It keeps track of the current instruction being executed by your program. It’s like having a GPS telling you where to go next. The PC Register makes sure your program follows the right path and keeps things running smoothly.
4. Method Area
The Method Area is like a big library filled with knowledge. It stores information about classes, methods, and constants used in your program. It’s like a reference book that your program can consult whenever it needs to know something.
5. Native Method Area
Lastly, we have the Native Method Area. This is like a bridge between your Java program and the outside world. It allows your program to access functions or features that are not written in Java. It’s like having a special translator that helps your program communicate with other systems or libraries.
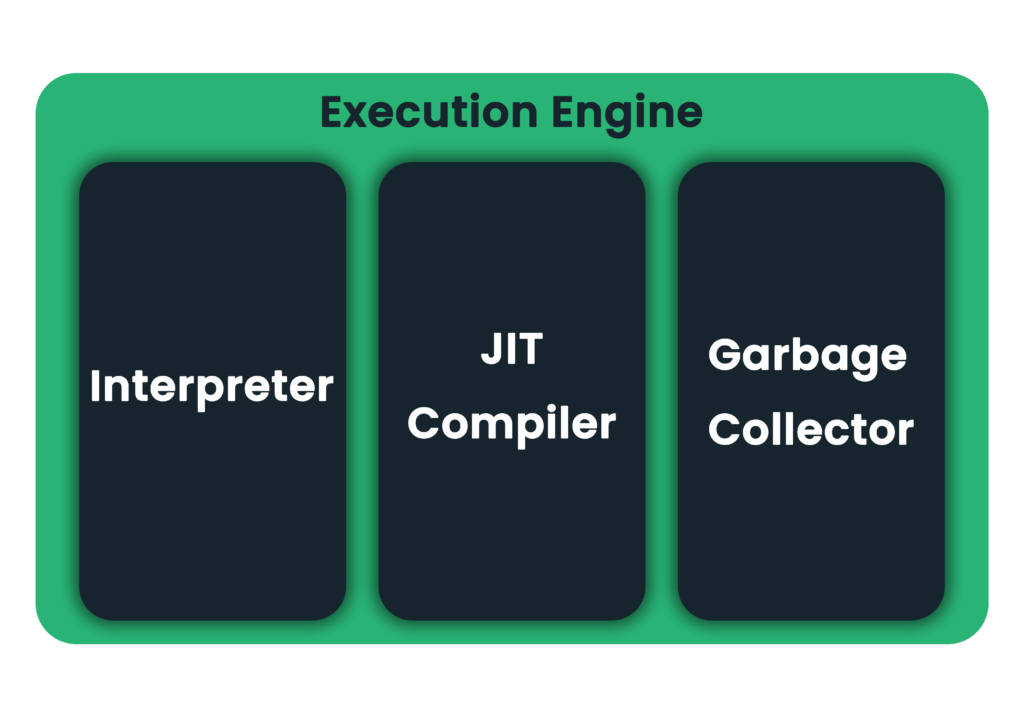
Execution Engine In JVM Architecture
We explored the Java Memory Areas and how your program can use them to manage and store data. Now let’s turn our attention to the “Execution Engine”—the brain of JVM. So let’s explore this incredible component’s inner workings now!
Imagine the Execution Engine as a diligent translator who takes your Java code and converts it into a language that your machine can understand and execute. It’s similar to having a magic wand that can turn your words into action. The Execution Engine is crucial to the effective and efficient operation of your program.
Now, let’s break down the Execution Engine into its two key parts:
1. Interpreter
Picture the Interpreter as a trusty guide who follows a set of instructions step-by-step. It reads your Java code line by line and performs the actions accordingly. Just like following a recipe to bake a delicious cake, the Interpreter ensures that your program’s logic is executed correctly. It’s like a dependable companion who ensures everything is in order.
2. Just-In-Time (JIT) Compiler
Imagine having a personal language wizard who helps you express your thoughts faster and more clearly. That’s what the JIT Compiler does! It’s like having a genie who translates and optimizes frequently used code segments on the fly. As your program runs, the JIT Compiler identifies these segments and compiles them into a language that your computer’s processor can execute more efficiently. It’s like having a personal assistant who makes your program faster and smarter.
The combination of the Interpreter and JIT Compiler in the Execution Engine provides a powerful duo that maximizes the performance of your Java program. While the Interpreter ensures the accurate execution of code, the JIT Compiler enhances efficiency by optimizing frequently used code segments. By dynamically analyzing and optimizing your code during runtime, the Execution Engine helps your program achieve better performance. It’s like having a team of experts constantly fine-tuning and improving your program’s execution.
3. Garbage Collector in JVM Architecture
The garbage collector is like a helpful cleaner in the Java Execution Engine. It keeps an eye on memory usage and removes things that are no longer needed, just like a janitor tidying up a room. By doing this, it prevents memory clutter and ensures your program runs smoothly. It saves you from the hassle of managing memory manually, allowing you to focus on writing code and building your application with ease.
We have looked into the interesting realm of Java Memory Areas and the Execution Engine as we try to solve the secrets of Java. Let’s explore new ground as we go into the worlds of Native Method Libraries and JNI (Java Native Interface).
Java Native Interface In JVM Architecture
Let’s understand what JNI is all about. JNI acts as a bridge between the Java programming language and native code written in languages like C or C++. It enables Java programs to interact with and utilize functionalities that are specific to the underlying operating system or hardware. It’s like having a secret passage that connects the world of Java with the power of native code.
Native Method Libraries In JVM Architecture
Now, let’s explore the role of Native Method Libraries in this process. A Native Method Library is a collection of functions written in a native language that can be accessed and invoked by your Java program using JNI. These libraries act as powerful tools that extend the capabilities of your Java programs beyond the boundaries of the Java language itself.
Imagine you’re a chef in a restaurant kitchen (Java program), and you want to create a unique dish that requires using specific cooking techniques or ingredients not available in your kitchen. JNI acts as a translator, helping you communicate with chefs from different countries (native system libraries) who specialize in those techniques or have access to those unique ingredients. With JNI, you can ask them for assistance or collaborate with them, bringing their expertise into your kitchen.
Native Method Libraries
Similarly, Native Method libraries are like a specialized toolbox that contains unique cooking tools (pre-compiled code) designed for specific tasks. They provide you with the necessary tools and resources to accomplish tasks that Java alone cannot handle. You can use these tools to enhance your cooking skills and create exceptional dishes. In this analogy, JNI serves as a language bridge, allowing you to communicate with experts from different culinary backgrounds, while Native Method libraries offer you specialized tools to expand your cooking abilities.
Unlocking New Potentials
Together, JNI and Native Method libraries enable your Java program to tap into platform-specific functionalities and access optimized resources, just as a chef collaborates with international experts and uses specialized tools to create extraordinary culinary creations.
In conclusion, JNI and Native Method Libraries open up a world of possibilities for your Java programs. They allow you to tap into the power of native code, enabling you to access system-specific functionalities and leverage existing libraries and resources. It’s like having a secret passage to unlock new potentials and extend the capabilities of your Java programs.
Conclusion
- Class Loader Subsystem: It’s like a helpful librarian that finds and organizes the Java classes your program needs.
- Runtime Method Areas:
- Heap: Your program creates and manages objects in this dynamic area, which resembles a humming marketplace.
- Stack: Imagine it as a deck of cards that records method calls and promotes efficient execution.
- PC Register: It’s like a compass that guides the program to the current instruction being executed.
- Method Area: This is a repository that functions as a sizable library for the data on classes, methods, and constants.
- Native Method Area: It serves as a link between your Java program and other languages’ code to enable specialized functionality.
- Execution Engine: It’s like a translator that converts your Java code into a language that the computer understands and executes. It has an interpreter that follows instructions step by step and a JIT compiler that optimizes frequently used code segments for faster execution.
- JNI and Native Method Libraries: JNI allows Java programs to interact with code written in other languages, such as C or C++. It enables you to tap into system-specific capabilities or use existing libraries.
Understanding JVM architecture helps you understand how Java programs run and how different components work together. It empowers you to write efficient code and explore the possibilities offered by JNI for system-level interactions.
So, as you continue your journey in Java programming, embrace the power of JVM architecture and its various components. Explore the class loader subsystem, memory areas, execution engine, and the opportunities provided by JNI. Enjoy coding and have fun exploring the exciting world of Java development!